Category: Blogging

  • Painting Wicker Patio Furniture

    What is it about moving into a new place that gets us all excited?  The prospects, the dreams, ideas and then truly making it a home.  It is like a fresh start, a way to do all the things you have always wanted to do.  So you know what that means. It’s time to search the web and look for inspiration and the possibilities are endless.

    Once we moved in my “To Do” list has grown by a miles and miles.  One project that I already started was painting wicker patio furniture that my Mom had given to us.  Then, of course, I also wanted to make covers for the existing cushions, but that will come next.

    The wicker furniture was white with rose colored cushions which definitely needed an update.  I chose KONA coffee color by Rust-o-leum, I bought the 2x double coat, glossy.  All in all I used about 8 cans of paint, not bad considering new furniture is well into the hundreds of dollars plus I saved money with the True Value hardware coupons I used.

    painting wicker _before

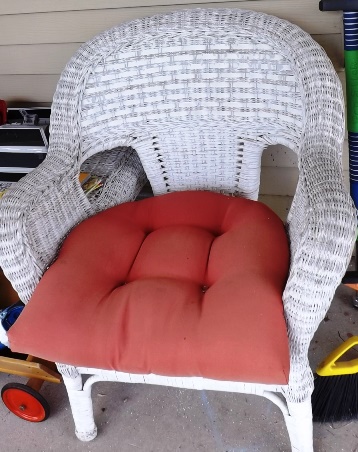
    Wicker chair before painting

    Painting Patio Furniture

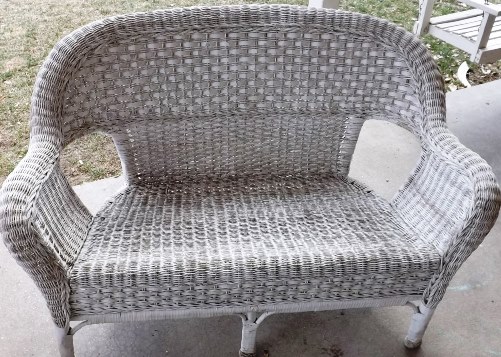
    Wicker couch before Painting

    painting_wicker2

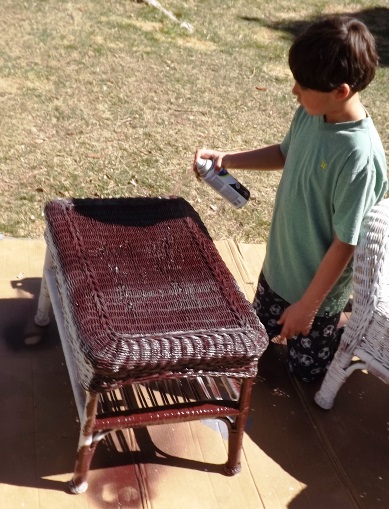
    The perfect opportunity to teach my oldest son how to spray paint, he loved doing it.

    Painting Wicker

    Voila, the After!  I think it looks like a new set!

    Can’t wait to make the seat covers, I have the perfect fabric for the job.  Here’s to a new place with new possibilities!


  • Using Wall Decals

    All over Pinterest these days I’ve been seeing those way cool sayings and scriptures people are putting up in their homes on their walls. I love them but thought there was no way I could paint letters in a straight line let alone make them look consistent. I would just have to admire them on Pinterest.

    However, a little trip to Hobby Lobby and everything changed! They have wall decals that cause no damage to surfaces, love that!  The selection was huge and my husband even liked the idea.  We picked out three and headed to our new home excited to put them up.

    I started with one wall decal in our living room, but it took about 45 minutes to get about 4 words done! My walls happen to be textured which makes them not so easy to work with.  I was a bit discouraged and gave up for a few days. I was sitting there thinking I wish I had a shiny, smooth surface available… and voila!

    I was scouting a location and boom, the side of my IKEA Expedit was perfect!  When you are walking down our hall it is the main focal point.

    Ikea Expedit

    Wall Decals Ikea Expedit

    I love it!  Do you?

  • Open House at Homeschool Connection

    One day a week my two oldest boys go to school, they get to get up, get their backpacks ready and head out the door early in the morning.  A local school district offers a one day a week program for homeschoolers and my boys absolutely love it!

    Last Semester they took classes such as cooking, piano, play performance, fitness, science, and art. Another neat thing is that each semester the kids can choose which classes they want to take, sort of like in high school.

    The Homeschool Connection recently hosted an Open House to showcase all that the students had done throughout the first semester.

    Homeschool Connection Open House


    Open House Homeschool Connection

    Oliver played one of the seven dwarfs in a mini-play, Preston played “America” on the piano, they both cooked up some delicious treats for the parents and they loved showing us their class pet lizard.  I am so thankful that there is an option for homeschoolers, it has been a great experience!

    This also means I get to spend that day with my youngest boy who is only 4 years old, just him and I which is a treat. Anyone that has more than one child knows how balancing time between them can be sometimes so this is really helpful.

  • Kids Quick and Easy Homemade Pizzas

    Ever in a pinch for dinner, had a busy day and not sure what to make in hurry? My husband stopped at the store on his way home from work after he knew I had a very busy day.  I told him to decide what we would have that night.

    He came up with an idea that would please us all, that even catered it to each one of our likes… Homemade Pizzas! But do you want to know the thing that made this delicious dinner so quick and easy? Pita bread for crust! Which does not require anytime to prepare or bake like homemade dough would.

    Kids Homemade Pizzas

    Quick and Easy Homemade Pizzas:

    • Pita bread
    • Pizza sauce
    • Cheese of your choice
    • Toppings, meat, veggies etc.

    We spooned on about 1 tbsp pizza sauce per pita, then added toppings such as pepperoni, Colby cheese, mozzarella,  mushrooms, Canadian bacon, and olives. We each made our own, and wow did the kids ever love doing this! Daddy was our hero!

    We cooked the pizzas on a cookie sheet for 7 minutes, then on the rack for 5 more. Cook times may vary depending on your oven and temperature. For a crispier crust cook longer directly on the rack. Be sure to check on your pizzas so as not to overcook. Delicious!

  • Looking Back on Christmas 2012

    I almost can’t believe how quickly it is all over with, this Christmas rush, gathering with family and friends… all of it.  So much anticipation then it comes and goes like a flash.  We enjoyed this Christmas so much and created lots of memories.

    Homemade Christmas cards, the fun was in taking them, especially with a funny lil guy making us all crack up.

    Homemade Christmas Cards

    Seashell Christmas Ornaments we made for the family:

    Easy Christmas Ornaments

    The Annual Women-of-My-Family Cookie Exchange: We exchanged a variety of different types  of cookies this year and we had some newcomers to the cookie exchange as well.

    Cookie Exchange

    A wonderfully uncrowded trip to the “big” Museum, on a gorgeous day in December:

    Denver

    Many, many, many hours on our 1 and only Black Friday deal – Monopoly – Electronic edition!

    Monopoly Electronic edition

    All in all, it has been fantastic.  We also had the privilege of attending an wonderfully touching Christmas Eve Service, so blessed!

    For New Years Eve I treated my dear husband to a pan seared steak (thanks to Sean and Debbie for the great Emeril cast iron pan), creamed spinach, baked potatoes and salad.  We ate by candlelight while the kids had their own New Year’s Eve party in their room, taquitos, doritos, candy and all.  We gathered at 10 to pop the Martinellis and countdown.  One of the best NYE’s ever!

  • My Budding Photographer

    Preston Photos

    My oldest son has taken a liking to photography and I couldn’t be happier!  He has been taking a photography class and he has loved it.  We visited an Italian Festival a couple of weeks ago and we let him loose with the camera.  It wasn’t until this week that I looked at the pictures.  He did a fantastic job.  He snapped handcrafted goods, people and food.  I thoroughly enjoyed seeing the festival through his eyes.

    Preston Pictures

    Photographs by Preston

  • Green Chili Chicken Burritos

    Smothered Chicken Burritos

    Ooooooooo do I have say anything more?  Yes?  Well ok.  These are to-die-for Smothered Chicken Burritos made with Green Chili from fresh roasted Hatch green chili’s.  We usually eat bean burritos, the tradition passed down from my Mom.  Recently, my Husband asked me to make chicken ones.  No problem, sounded good to me, I used my usual recipe but switched out beans  for chicken .  Inside I slathered sour cream, pan fried chicken breast, and shredded cheese.  Top with pork green chili and cheese, pop in the microwave for 1 minute.

    Of course we just got bushels of fresh roasted chili, we are gung-ho with smothering everything in it.  I made our family recipe for pork green chili with them.

    If you pick some up  – be sure to let them steam in the bag they come in  for a couple of hours, the skin comes off like a glove.  I peel, rinse, and store in freezer bags.  I freeze about 4-5 in a bag, perfect amount for most recipes.

    Freezing Hatch Green Chili

    Green chili can add the extra flavor you crave on just about any of your favorite foods like cheeseburgers, burritos, chicken burritos, enchiladas, breakfast foods, eggs, potatoes… you name it!

  • Fresh Roasted Hatch Green Chili, a Family Staple

    Hatch Green Chile Roasted

    Our favorite Hatch green chili and Pueblo green chili stand.

    It is that time of year again!  Every August we buy bushels of fresh roasted Hatch Green Chili’s and Pueblo Green Chili’s.  Oh, and you can have fresh garlic added to your green chili batch when they roast it too! We freeze the chili’s for year around family favorites. We have countless family recipes that call for this wonderfully, delicious green chili.  Anything from egg relish to my Grandma’s Chili, to my Mom’s famous Smothered Burritos and my green chili chicken burritos, we use it for possibly any meal of the day.  It is amazing chopped, with garlic salt and slapped on your favorite sandwich.

    The tradition of waiting for the perfect Fall Saturday afternoon and then finding our favorite Hatch Green Chili stand setting up their familiar yellow and white tent – the anticipation is palatable.  Not only does it conjure up thoughts of delicious meals but I can’t help but think of the seasons and activities to come.  Cooler weather with brisk air and blue skies, changing leaves, football Sundays, Fall Festivals, apple pies… then Christmas!  We make sure and buy enough Hatch Green Chili to last us through next August… which it never does.  The more we buy, the more we eat!

    Hatch Green Chile Roasted

    Check out my recipe page for recipes using roasted green chili’s.

    Hatch Green Chilis

    Don’t miss out! Get Hatch green chili or your favorite type of green chili while it’s in season.

    Want to know what to do when you bushels of roasted chilis?

    1.  The bushels are usually already assemble, let the roaster which kinds you want (Med, Mild, Hot, Mixed).  You usually get a discount for buying more.

    2.  After they roast them, they tie them up in a plastic bags.  Let those sit in the closed bag for at least 4 hours.

    3.  Have plenty of freezer bags on hand, I buy the sandwich sized ones.  I put 6-8 chilis in each bag.

    4.  When you are ready peel the chilis, rinse and put them in the freezer bags.  Do NOT put the skins down your drain, make sure you throw away in the trash. I used a strainer, under the faucet to peel and rinse the chilis.

    5.  When closing the bags make sure you get all the air out.  Label your bags and throw them in the freezer.

  • End of Summer Moments to Remember

    One of my favorite blogs, one of the blogs that was a huge help early in my homeschool journey is 1+1+1=1.  I was at her site recently and I came across a link-up that sounds  fantastic.

    Here is the description:
    “Moments to Remember was developed as a simple way to look back on our week as homeschoolers and find photos that encompass the memories we want to remember.
    The week may have been tough, there may have been more bumps than smiles, but in the end these are the moments that keep us going, the ones we need to remember.”

    I love this idea.  Especially since I know this blog is basically my journal, something I can look back on in the years to come.

    This week was our last week of Summer, we start school on Monday.  We headed downtown for some family fun…

    My youngest also turned four!

    Sams 4th Bday

    Here’s to a fantastically fun Summer, now on to School and my favorite Season of all Fall!